Using mydbDiffo
Allow me to give you a brief overview about how mydbDiffo improves upon dbDiffo, and its new features, providing a fast and convenient way to modify your databases.
I will use a basic sample database to demonstrate how the features work. This a simplified online store’s database.
First, I log in, and mydbDiffo creates me a model from the existing database. Then I add a new table, add a new column to an existing table, and finally, create a foreign key. I run these changes against the database. Running the change SQL script will produce an error (the foreign key can’t be created); I will show you how can you fix such issues with mydbDiffo.
Logging in and reverse engineering the data model
In the login window, enter the database login information, and click Login.

After successfully logging in, the application starts to reverse engineer the database model. (It is a small database, so the process only takes a few seconds. The reverse engineering message is only visible for a brief moment.)
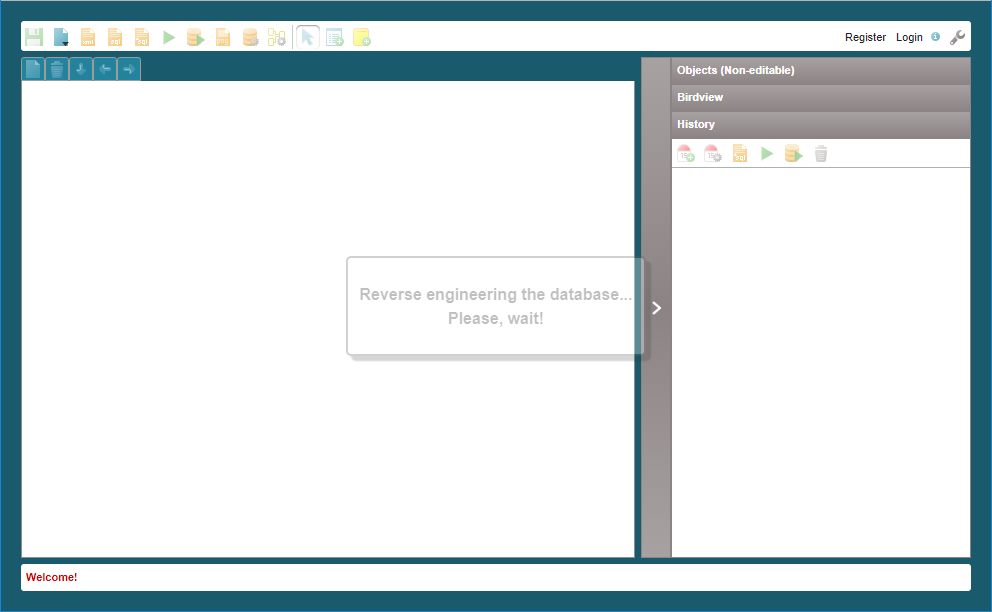
The program saves the finished data model to the server.

The mydbDiffo toolbars
As you can see, mydbDiffo’s toolbars are slightly altered. (Differences are marked with a red frame.)
dbDiffo toolbar:

dbDiffo History toolbar:

mydbDiffo toolbar:

mydbDiffo History toolbar:

The main toolbar of mydbDiffo is missing the New document (![]() ), Open document (
), Open document (![]() ), and Save document (
), and Save document ( ) buttons. They are replaced by a new Save document (
![]() ), with the same icon and tooltip, but with a different method of saving, and Open file menu (
), with the same icon and tooltip, but with a different method of saving, and Open file menu (![]() ).
).
mydbDiffo only manages the model of the database you are logged into, and stores the model in that database. This makes New document redundant. Save document saves into the database.
To access dbDiffo’s Open document and Save document functionality, click the Open file menu button. This opens a small menu, allowing to save the model to dbdiffo.com or a local computer, or to load the model from dbdiffo.com or a local computer. The latter option will be used very rarely. In general, loading should only be used when absolutely necessary.
Opening an external model file can easily overwrite a correct data model consistent with your database.
Also, two buttons were added to both toolbar. These are Execute (& Save) (![]() ) and Show SQL history (
) and Show SQL history (![]() ).
).
mydbDiffo’s Execute (& Save) (![]() ) feature creates a change script in the backround according to the changes made, and immediately runs it against the database. The model and the SQL statements you just ran are saved to the database. The SQL History opens, listing the previously run SQL statements.
) feature creates a change script in the backround according to the changes made, and immediately runs it against the database. The model and the SQL statements you just ran are saved to the database. The SQL History opens, listing the previously run SQL statements.
Show SQL history (![]() ) opens the SQL History window without running the script first. We will get back to this later.
) opens the SQL History window without running the script first. We will get back to this later.
mydbDiffo History
In History, not only the tool was changed, but the appearence of the performed steps as well.
In History, steps from which mydbDiffo has already generated SQL statements and run against the database, appear greyed out and italicized. These steps cannot be deleted anymore.
Changing the database
I won’t explain the process of changing the database in detail. If you are unfamiliar with dbDiffo, check out these training videos:
https://dbdiffo.com/videos.php
I added the productgroups table to the database, added a new column, pgroup_id, to the products table – it can never be NULL –, and created a foreign key between the products and the productgroups tables. In the following figure, all changes to the model and new steps added to History appear in a red frame.
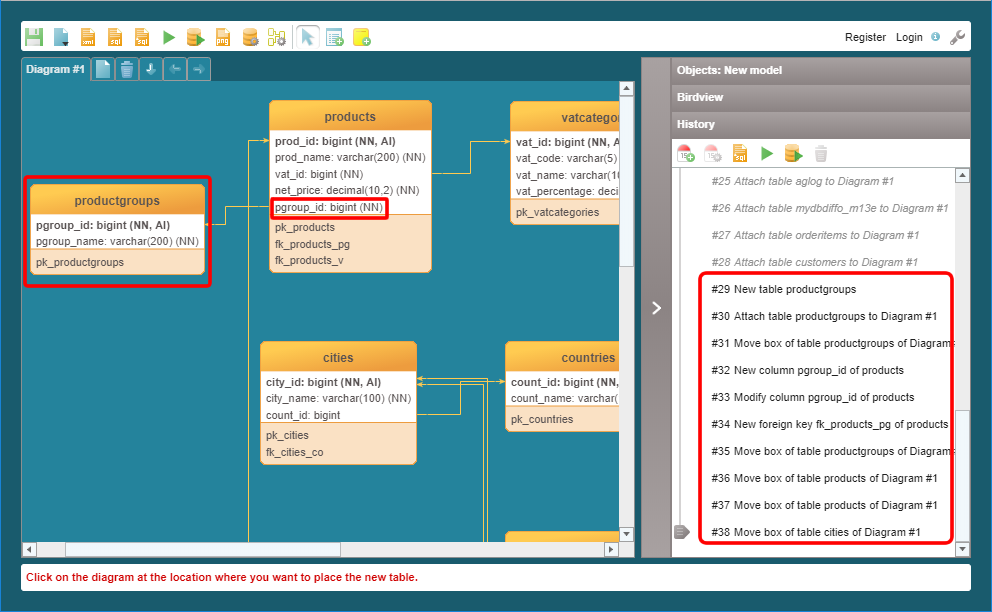
Notice that steps added to History are not greyed out and italicized. This indicates these changes have not been applied to the database.
There are two methods to applying the changes.
- Generating and running a change script.
- Immediately run and save.
Generating and running a change script
If no steps were selected in History, mydbDiffo’s Generate change (alter) script from selected or all history steps feature ( ) can generate a change script using only the new steps. If the feature is selected, SQL statements are generated as they were in dbDiffo.

As you can see, an Execute button was added to the mydbDiffo UI. This allows SQL statements currently in the SQL statements editable text field to be run against the database. At this point, statements can be extended or changed, you can even cancel the execution. Clicking Execute runs the SQL statements, saves the model, and opens the SQL History window.
Immediately run and save
If you don’t want to review the generated SQL statements before running them, use Execute (& Save) (![]() ) from the toolbar, and mydbDiffo will immediately create a change script in the backround and run it against the database. The model and the SQL statements you just ran are saved to the database. The SQL History opens, listing the previously run SQL statements.
) from the toolbar, and mydbDiffo will immediately create a change script in the backround and run it against the database. The model and the SQL statements you just ran are saved to the database. The SQL History opens, listing the previously run SQL statements.
Now I will use this feature to change the database. Running these SQL statements produces an error message. The SQL History window opens.
SQL History
After running SQL statements, the SQL History window opens. It also has a toolbar, allowing to modify or delete SQL statements yet to be run, insert new SQL statements, move SQL statements, or run again the previously run statements. None of these require explanation.
On the other hand, handling failed statements merits a few words.

If there is a failed statement (as in this case), mydbDiffo jumps to the failed statement’s row in the table. Double-click the Show error text to display the error message.
We have several options. Either fix the existing statement (double-click the SQL statement (ALTER TABLE `products`...), select the failed statement’s row, and choose Modify (![]() ) from the SQL History toolbar, or insert new statements before the failed statement.
) from the SQL History toolbar, or insert new statements before the failed statement.
I will choose the last one.
I’m inserting an INSERT and an UPDATE statements before the ALTER TABLE statement. INSERT creates a default product group, while UPDATE sets all products to belong to the default group.
I’m selecting the ALTER TABLE statement, and choose Insert before (![]() ) from the toolbar.
A simple editing window opens, where I can enter one or more SQL statements.
) from the toolbar.
A simple editing window opens, where I can enter one or more SQL statements.

After entering two statements and clicking Ok, the statements appear before the ALTER TABLE statement.

Finally, I’m running the not yet run SQL statements, clicking Execute (& Save) ( ) on the SQL History window’s toolbar.
If all statements finish without errors, only checkmarks are visible in the State column, and the view scrolls to the last statement.

That was my overview of mydbDiffo’s functions. There is yet another new feature, Make love, not code!, that appears on the floating toolbar of the diagram’s selected table, but it will be discussed in a separate article.
If you have any questions, feel free to contact the dbDiffo Support Team.